Informations
1. Registration and Download
Registration
If you haven't registered yet, you can do so for free here. Just enter your username, e-mail address, and password, then agree to the terms and conditions. You will receive a confirmation link via e-mail — click it to activate your account.
If you already have an account, simply log in and start playing!
Download
Download the game client for free in the Download section. You can find detailed installation instructions in the Installation guide.
System Requirements
Software:
- OS: Windows XP / Vista / 7 / 8 / 10
- DirectX 9.0c
- Broadband Connection
| Minimum | Recommended | |
|---|---|---|
| Hard Drive | 3.0 GB | 3.0 GB |
| CPU | Pentium 4 2.0 GHz or AMD equivalent | Pentium Dual Core or AMD equivalent |
| RAM | 512 MB | 2 GB |
| Video Card | nVIDIA GeForce 5200 / Radeon 9550 | nVIDIA 7600GT / ATI X1600XT |
Questions?
If you have any other questions, please check out the Support page or contact our team.
2. Installation
Installing the Game
After downloading the installer, follow these steps:
- Double-click the downloaded installer file.
- Follow the on-screen instructions to install the game.
- Choose the installation directory (we recommend the default path).
- Wait for the installation to complete.
- Launch the game using the desktop shortcut or the Start menu.
Patching
When you launch the game for the first time, it will automatically download and install any available updates. Make sure you have a stable internet connection during this process.
Troubleshooting
If you encounter any issues during installation:
- Make sure you have enough free disk space (at least 3 GB).
- Run the installer as Administrator.
- Temporarily disable your antivirus if it blocks the installation.
- Check that DirectX 9.0c is installed on your system.
3. Starting the Game
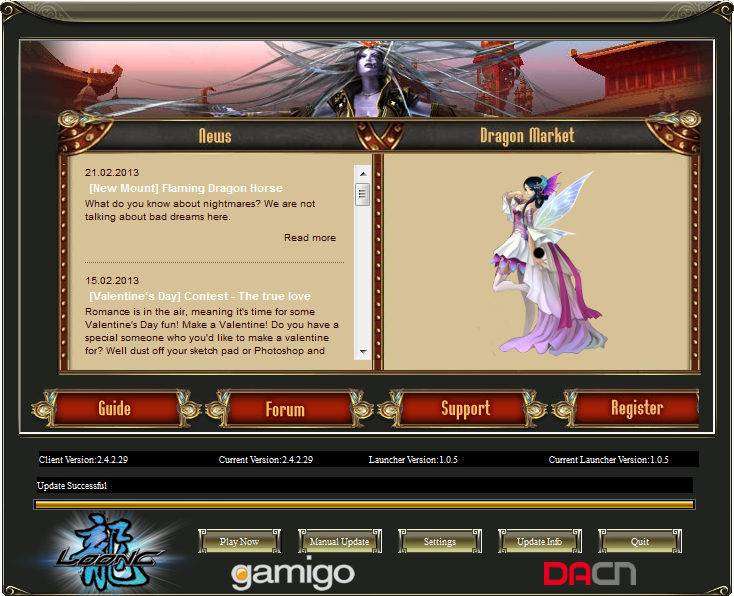
1. After installing Loong, start the game from the Start menu or by clicking the shortcut on your desktop.

2. The Loong client opens and automatically installs available updates. Once updated, launch the game by clicking "Play Now."
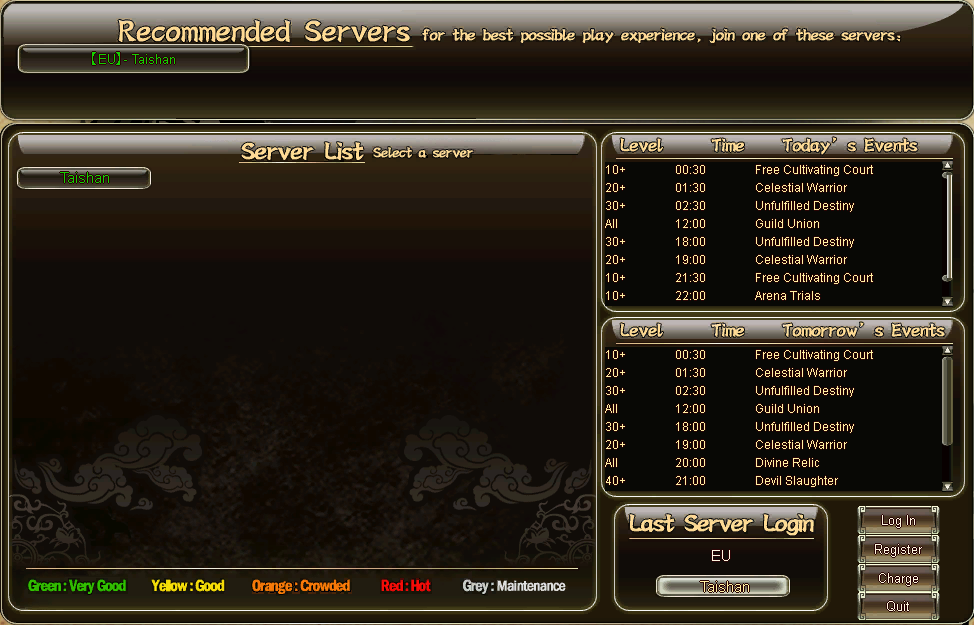
3. The server selection screen will appear. Choose your preferred server and click "Login."
4. Enter your username and password. If you do not have a Loong account yet, you can register here.
Enjoy!
4. Character Creation
Character Creation
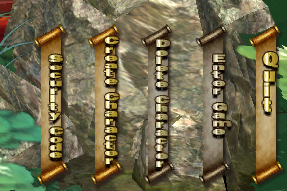
Once you’ve logged into the game, you are brought to the character creation and selection screen. From here you can create, delete and select characters.
Security Code
To delete characters, you will need a security code. You can create this security code by clicking the “Security Code” button at the bottom right of the screen.
Creating a Character
To create a character, click on the "Create Character" button, located at the bottom right of the screen.
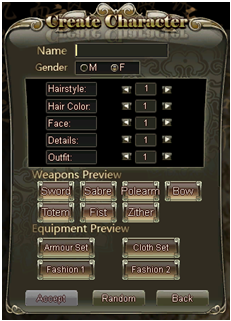
This will send you to the character creation screen, where you can give your character a name, choose its appearance, and get a preview of what your character may look like one day.
Select different values for Hairstyle, Hair Color, Face, Details and Outfit to customize your character.
Name
Remember to choose your name wisely. You will not be able to change the name of your character later in the game. Your name is the first impression other players get of you and your character. To stay in the spirit of ancient China you may want to look online for traditional Chinese names, or make up your own.
Please follow our naming guide when creating your character name. These naming rules can be found here.
*Your name can only have a maximum of seven characters.
Previews
The weapon and equipment previews are to give you an idea of what your character may look like later on. None of the options will have ANY EFFECT on your character. Even if you click on “sword” and “Armour Set”, your character will NOT start with these items.
*Only the "Outfit" option will change the way your character looks at the beginning of the game.
Random
By clicking the "Random" button all values will be chosen by the game program. This will NOT select a random name for your character.
Finishing
Once you are ready, click “Accept” to create your character. This will send you back to the Character Selection screen where you will need to select your character by left-clicking on it and clicking the “Enter Game” button located at the bottom right of the screen.
Alternatively you can double-left-click on the character to enter the game.
Cancel
To cancel your character creation process, click on the "Back" button. This will send you to the Character Selection page.
Deleting a Character
To delete characters, you will need a security code. You can create this security code by clicking the “Security Code” button at the bottom right of the screen.
You can delete a character by first selecting it with a left-mouse click and then clicking on the “Delete” button at the bottom right of the screen.
You will need to enter your security code to delete the character. If you’ve forgotten your security code you can reset it; however, it will take 72 hours to process this request.
5. Interface
User Interface (UI)
A – Character Information
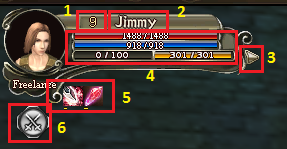
| 1- Character Level | Displays your current level |
| 2- Character Name | Shows your name |
| 3- Extra Options | Gives different options in special situation, for example if you are team leader you can set the looting options here |
| 4- Status Bars | Shows your remaining Health (red), Qi (blue) and Stamina (orange) points |
| 5- Buffs | Will show every buff and debuff currently active on your character. The yellow gauge bellow the buff icon shows the duration of the buff. If the gauge remains full, the buff is permanent. If the gauge slowly drains, it means the buff only has a limited duration. When the yellow gauge is empty, the buff will disappear. |
| 6- PvP | Toggles PvP mode on/off |
B- Target Information
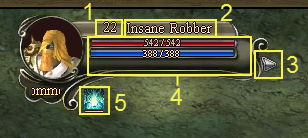
| 1- Target Level | Displays the current level of your target |
| 2- Target Name | Shows the name of your current target |
| 3- Extra Options | Gives different options in special situations |
| 4- Status Bars | Shows your target's Health (red) and Qi (blue) bars. |
| 5- Buffs | Displays your target's buffs and debuffs. The yellow gauge bellow the buff icon shows the duration of the buff. If the gauge remains full, the buff is permanent. If the gauge slowly drains, it means the buff only has a limited duration. When the yellow gauge is empty, the buff will disappear. |
| 6- Difficulty | Shows the target's level of difficulty, such as Common, Elite, Boss… |
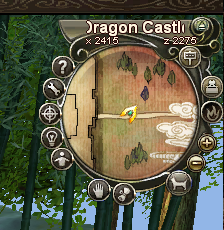
C- Mini-Map
At the top of the mini-map you will find the name of the area you are currently in, as well as the exact coordinates of your location – in this case: x3326 z3535
These coordinates will help you to return to a previous location, find special in-game events, or indicating to a friend exactly where they can find you.
D- Chat Box
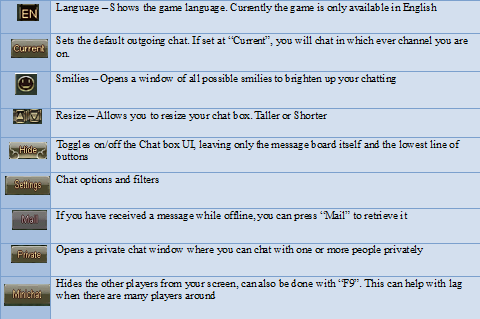

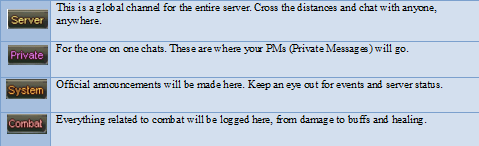
These are your various chat channels. Choose the channel you wish to see or choose "All" to keep up with everything that is currently happening. The chat channels "Team" and "Guild" will be silent until you join a team or a guild.
E – Shortcut Bars

Left-click and drag your skills or useable items down to the shortcut bar to have them automatically bound to the key indicated. The blue bar in the middle, here surrounded by a yellow circle, is your experience bar.
There are four main shortcut bars (1 - c+F4) through which you can scroll with the small arrows on the right and left.
There are two mini-bars (F1 – F8 and a+1 - a+8) located above the main one. These can be toggled on and off. (default hotkeys [ and ])
*Only the shortcut bars mentioned above are available in Loong.
 | The left button opens your Character Window. The right button opens your Skill Window. |
F- Quest Tracking
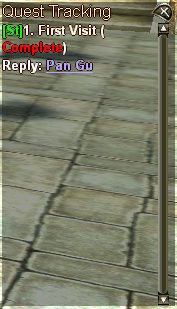
The quest tracking window is turned on by default. This is the list of quests that you are currently tracking.
When you accept a quest, it will automatically appear in your Tracking window.
The following information can be found in the quest tracking:
[Location] 1. Quest Name (Status)
Items to retrieve or Monster to destroy 0/3
Quest reply: NPC who gave you the quest OR who will give you the reward
*In Loong you do not always have to return to the same NPC who gave you the quest in order to complete it. Pay attention to the NPC in the "quest reply".
You can click on an underlined name in the quest tracker to automatically run to the location.
Note that you may sometimes be unable to start the waypoint system if you are not on the right map, or if your character is in blocked position such as being on a steep hill, or being too close to objects such as trees.
G – Secondary Target Information
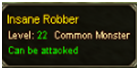
This is a shorter version of the Target Information. It lists the name, level and difficulty of the monsters and more importantly, whether the target can be attacked or not. Certain NPCs such as merchants cannot be attacked.
H – Menu
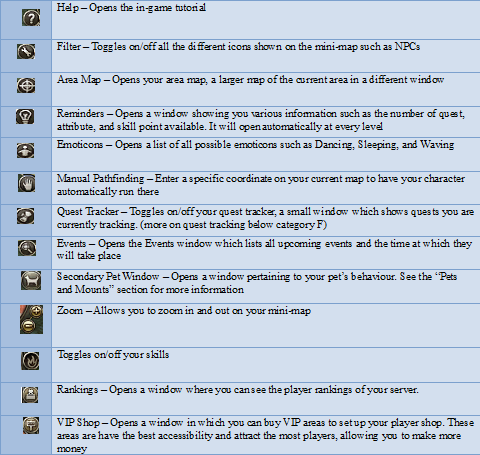
This is a list on the right hand side of the screen that will open up shortcuts
6. Basic Controls
Moving
There are two ways to move your character in Loong.
Keyboard
The default hotkeys for character movements are WASD.
Mouse
You can use the left-mouse button to move by pointing to the location you want to reach and clicking once. You can also left-click on links in your Quest Tracking or Quests window to have your character automatically run there. Double left-clicking on the name of an NPC on the local map will also have your character run to the location.
*If the area is inaccessible or if your character is blocked by a steep cliff or an object, the automatic running may not work. Move your character a few steps before trying again.
Combat
To initiate combat, you first need to select your target. You can do this by left-clicking the enemy once, or hitting "Tab" on your keyboard – hitting "Tab" more than once will cycle through all of the enemies nearby. After selecting your target, you can begin fighting by left-clicking your target once more; this will cause your character to use the weapon currently in use against the enemy. If your character is too far away to attack, it will move to the appropriate distance before attacking.
*If you move during battle, you will need to reinitialize combat, either by using a skill or by double-clicking the enemy.
Alternatively, you can begin a fight by using one of your skills on the target. After using the skill, your character will continue attacking the enemy with its weapon until directed otherwise.
Once the target is dead, your character will stop attacking EVEN IF there are more enemies attacking you. You need to actively select another target and initiate combat for every enemy.
Combos
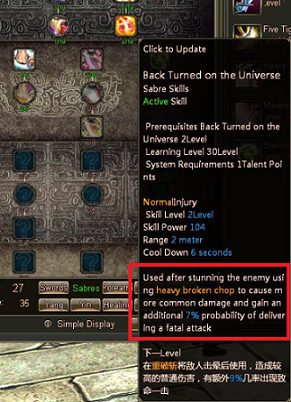
Once you have advanced in a particular skill tree, you will unlock powerful combos which will speed up your battles. When reading the tooltip of certain skills, some of them will tell you that they can only be used after a particular skill.
In the case of the combo skill here, not only do you need to use the "Heavy Broken Chop" skill, but the enemy will have to be stunned in order to complete the combo.
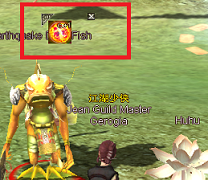
The combo window will appear in the middle of your screen, showing you the icon of the next skill required to complete the combo. Some combos can only be completed once, and the window will disappear once you have performed the appropriate skills. But other combos are repeatable and the combo window will remain open for a period of time, allowing you to perform the combo more than once.
*Some combos need to be performed immediately, and if you use a different skill instead of the one needed, the combo window will disappear.
Looting
Once an enemy has been defeated, it will leave loot behind. You can pick up this loot manually by left-clicking on the items, or you can push the gather items key (default hotkey "`" – located right under your Esc key). Some pets will also pick items up for you. See the "Pets" guide for more information.
*Make sure there is enough space in your inventory to pick up loot. You can carry as much money as you want.
Death
If your enemies manage to bring your health down to zero, you will be incapacitated. There are a few options available to you when this happens, and a window will appear prompting you to choose one.
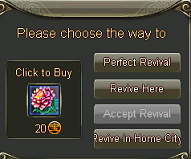
Perfect Revival
This consumes 5 "Incarnation of Lotus". You will reincarnate where you stand with HP, MP, and Stamina.

Incarnation of Lotus Revive Here consumes 1 "Incarnation of Lotus"; you reincarnate at the same spot, but with only a fraction of your HP, MP, and Stamina.
Accept Revival Other players can revive you if they have learned the appropriate skill. You need to click this button to accept their revival. Revive in Home City will revive your character in the city where it is bound. (See the "Maps" guide for more information on binding)
Gaining Experience
Killing monsters will get you some amount of experience, so will completing quests, crafting and other various activities. Combining all of these methods together, along with a few experience potions, will have you well on your way to reaching the current level cap.
Leveling
When you gain enough experience you will automatically level up. With each level you will gain attribute points and after level 10, skill points as well. Your experience bar is located in the middle of your shortcut bar, bottom of your UI.

Talking to NPCs
You can interact with a variety of NPCs in the game. To talk to an NPC, simply double-left-click on them. If your character is too far away, it will walk over to the NPC before interacting with it.
Quest Givers
NPCs who have quests for you, or quest updates, will have a blue or yellow exclamation or question mark above their heads. They will also appear on your local map as blue or gold exclamation or question marks. When you speak to these NPCs, the message box will have options for you to choose.
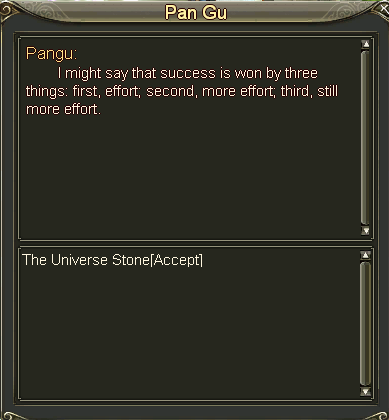
Click on "Accept" to view the quest information. You will still be able to cancel if you decide that you do not want the quest.
Once you have finished a quest, return to the appropriate NPC and speak with them. The options will look slightly different. If optional item rewards are given, you must select the one you wish to receive before you can complete the quest.
Merchants
When you put your mouse cursor over a merchant, it will change into a small bag of gold, indicating that the NPC is a merchant. When you speak to these NPCs, a new window will open with the merchant's wares, as well as your own Bag window.
Buy
To buy an item from a merchant, click-drag the desired object to your inventory or right-click the item. Make sure there is enough room in your inventory for the items. You can shift-right-click on an item to quickly buy multiples.
Sell
You can sell an item by click-dragging the item from your bag into the Merchant's wares window; or by right-clicking on the item once. When you try to sell items of value or ones that are bound to you, a message will appear prompting you to confirm or cancel the transaction.
*Right-clicking a stack of items will sell the entire stack!
7. Character Information
7-Character Window
1-Character Status (default hotkey "C")
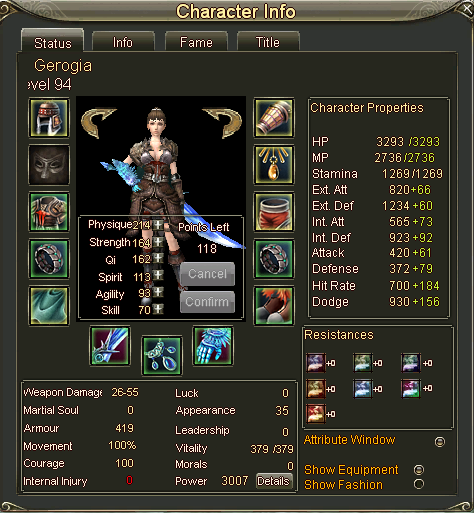
Contains all the information about your character as well as your current equipment. You can spend your attribute points in this window.
Attributes
| Physique | Determines your HP and External Defense; 1 Physique point gives 10 HP and 5 Ext. Def. |
| Strength | Determines External Attack and External Defense; 1 Strength point gives 5 Ext. Att. and 1 Ext. Def. |
| Qi | Determines Magic Points and Internal Defense; 1 Qi point gives you 10 MP and 5 Int. Def. |
| Spirit | Determines Internal attack and Internal Defense; 1 Spirit point gives you 5 Int. Att. and 1 Int. Def. |
| Agility | Determines Defense and Dodge; 1 Agility point gives you 4 Defense and 10 Dodge |
| Skill | Determines Attack and Hit Rates; 1 Skill point gives you 6 Attack and 10 Hit Rate |
Character Properties
| HP | The basic number of Hit Points of your character, determined by your Physique |
| MP | The basic number of Magic Points of your character, determined by your Qi |
| Stamina | The basic number of Stamina points of your character, determined by your level and can be increased in the "Tactics" skill tree |
| Ext. Att. | Reduces the rate of Internal Damage. Required for advanced ext.att. skills |
| Ext. Def. | Reduces the damage taken from weapons |
| Int. Att. | Determines the power of your Internal Attacks |
| Int. Def. | Increases the resistance to Internal Attacks |
| Attack | Determines the power of your attacks |
| Defense | Protects against critical hits |
| Hit Rate | This determines the chances of hitting your opponent |
| Dodge | The ability to avoid enemy strikes |
Resistance
Some enemies will use special attacks against you for which you will need specific resistances. There are seven types of resistances.
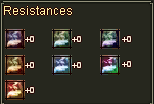 | Resistance types: Bleeding, Lightening, Critical, Poison, Mental, Internal, and Normal Damage. |
Additional Information
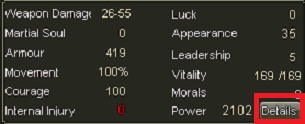 | 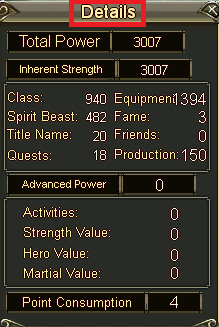 |
| Weapon Damage | The basic damage dealt by your main weapon. Depending on the weapon it can be a fixed number or a range as in the example above |
| Martial Soul | A value that allows you to compare weapons of the same level; the higher the Martial Soul, the better the weapon |
| Armor | The total amount of Defense received from your armor |
| Movement | Your current movement rate. Certain skills can increase this number, while debuffs may reduce it |
| Courage | Affects the damage you receive |
| Internal Injury | When you get killed, there is a chance of you receiving internal injuries; you will need to see a doctor in order to heal |
| Luck | Will help your weapon enhancing success rate |
| Appearance | Most equipment pieces equipped have an "Appearance" value; more expensive and better pieces usually have a higher "Appearance" |
| Leadership | Raises your team's experience rate, if you are the leader |
| Vitality | Raised by joining certain events. It is required to craft. Vitality will regenerate while offline |
| Morals | This PK value will go down the more people you kill; once it reaches -60, other players can kill you without receiving a moral punishment |
| Power | The cumulative power of your character. The higher the number, the stronger you are. Open the "Details" window to see a rundown of the values |
Equipment
There are two types of armor in "Loong": defensive equipment, which comes in the form of heavy armor and cloth armor; and fashion armor, which gives your character a unique style while also providing valuable bonuses.
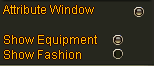 | Both fashion and defensive armor can be equipped at the same time, but only one will be visible on your character. You can toggle between the fashion and defensive armor anytime from your character window. |
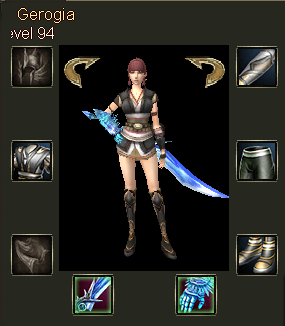 | The "Attribute Window" option allows you to toggle on/off your attribute information to better see your equipment. Notice that the fashion armor window has fewer slots; invisible equipment such as rings and necklaces can only be equipped in the defensive armor window. |
Equipping your Character
To add a piece of equipment to your character, open your Bag and locate the piece you wish to use. You can right-click the item or click and drag it to the appropriate slot in your Character Information window. (Both your Bag and Character Info windows need to be open.)
| Armor Sets — Some equipment comes in matching sets which not only look good, but also provide extra bonuses once you have all the pieces. Mouse over a set item to see how many pieces are in the set and how many you currently have equipped. | 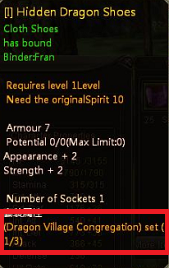 |
Upgrading Equipment
To upgrade your equipment you need to use certain crafting skills. See the "Crafting" section for more information on strengthening your equipment.
2-Character Info (default hotkey "T")
Introduce yourself to other players in this window by providing additional information. You can toggle the visibility of this information at any time with the option "Visible to Others". If you do not wish to share any information, simply leave the page as it is, or return all options to "Secret" and delete all text.
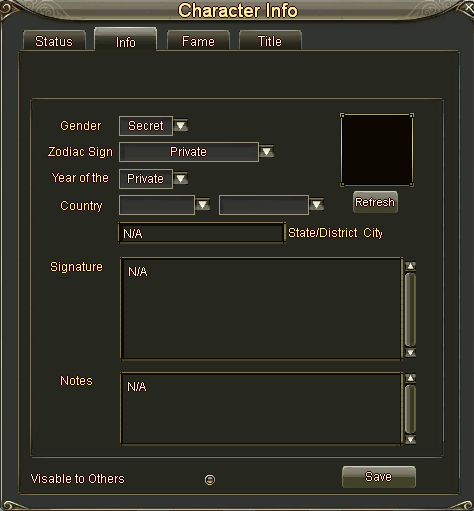
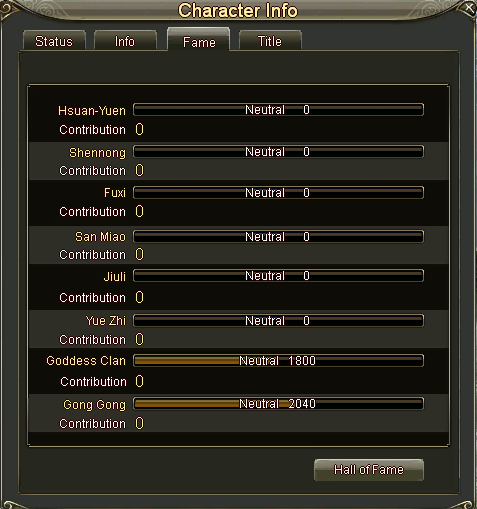
3-Character Fame (default hotkey "R")
You can keep an eye on your ranking with all the different factions in this window. If you gain enough influence with a faction, you will be able to buy special weapons from their shops. Different factions specialize in different weapons, so browse the merchants before choosing which faction to work for. To gain faction influence, turn in special items to the faction representative. These items can be acquired by doing quests. If you carry such items, a blue scroll will appear above the head of every faction representative in the city; you can then choose whom to speak to and turn in the items.
4-Character Title (default hotkey "J")
There are hundreds of titles that you can unlock in "Loong". Until a title is unlocked, its place in the Title window will be held by "???". To discover how to unlock a title, click one of the "???" and instructions will appear. To change your title, click the title you wish to use and click "Use". To use no title, click your current title and click "Discard".
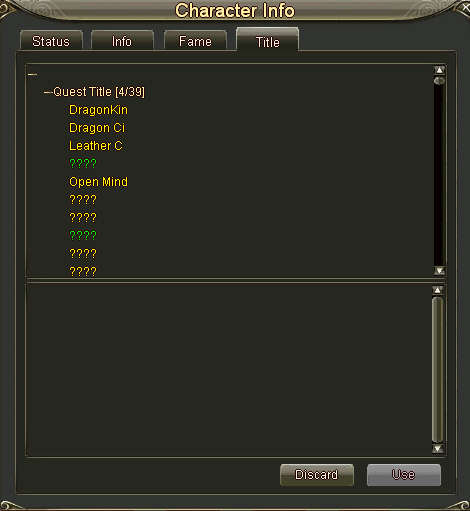
8. Skills
8-Skills (default hotkey "K")
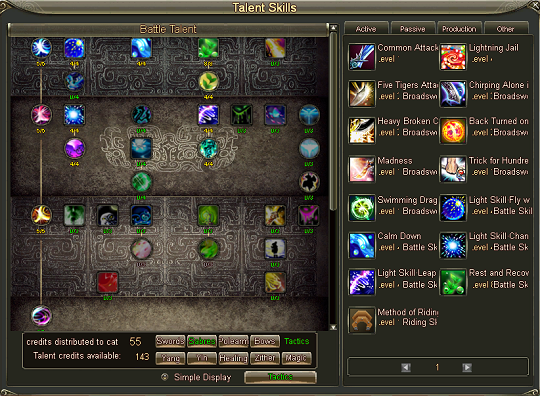
There are no classes in "Loong"; you are free to choose where to spend your skill points in the Skill Trees. But it is important to remember that you can only put points in three of the trees – two weapon trees and the Battle tree.
At each level after level 10 you will receive skill points. These can be spent in your skill window. The decisions you make here will affect your gameplay style as well as which weapons you will use. If you plan on being a melee-only fighter, putting points in bows and magic will not give you any benefits. Before level 30 you can reset your skill points at any time with items received from quests. Feel free to test a variety of combinations before choosing one which suits you best.
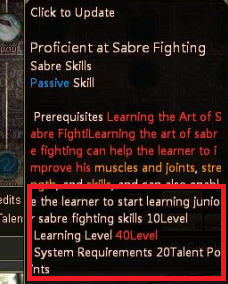 | Skills that you cannot yet put points in will be shown as question marks. These can be unlocked by spending points in the main tree branch, located at the left of the window. Note that you will not be able to immediately fill out your skills, as each stage has a level requirement. |
| You can purchase more skill points by clicking on the "Tactics" button at the bottom of the window. A new window will show the price of the next skill point to buy. Keep in mind that the price of skill points increases every time you buy one. | 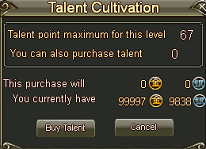 |
Active and Passive Skills
Square icons indicate active skills.
To use an active skill, drag it into your hotbar from the list on the right of the window. Then left-click it or use its hotkey.
Round icons indicate passive skills.
You do not need to put passive skills in your hotbar. They affect your character as soon as you put at least one skill point in them. Adding more points to the skill will increase its effectiveness.
Buffs and Debuffs
Certain active skills do not cause physical harm to enemies, but instead raise your own power or lower an enemy's power. Buffs are positive active skills you can use on your character or, if indicated, on a teammate. Some buffs are permanent; others have a limited duration. Read the tooltip of your buffs for more information.
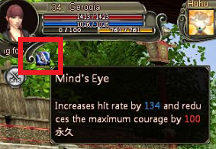 | Debuffs are negative effects which can be cast on an enemy. A debuff has a limited duration, but can drastically decrease your enemy's attributes, weapon skills, or speed. |
Every buff or debuff affecting your character will be displayed under your character information at the top left of your UI. They appear as small square icons under your status bars. Put your mouse over the icons to learn more about their effects.
9. Maps and Menus
9. Maps, Reminders and System Menu
There are three kinds of maps in Loong: the World Map, the Local Map and the City Map.
World Map (default hotkey: M)
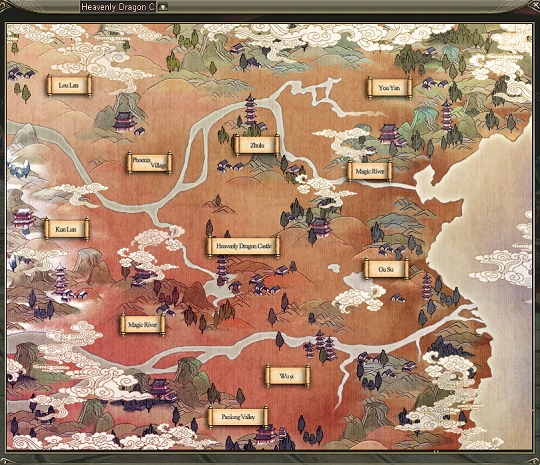
This is the overview of the entire world. Each name on the map is a different area that players can explore and quest in. You can view the local map of these areas by clicking on their names. Local maps will not appear for locked or unavailable areas.
Binding to a City
| You can save a lot of time and money by binding yourself to the city you are currently adventuring around. Once you reach Heavenly Dragon Castle you will be automatically bound to it. This means that when you use the Transport Flag you will return to HDC. |  |
Once you leave Heavenly Dragon Castle you can bind yourself to the next city by using the Samsara Stone in that city. Double-click on the stone to open a message window prompting you to accept or cancel the binding.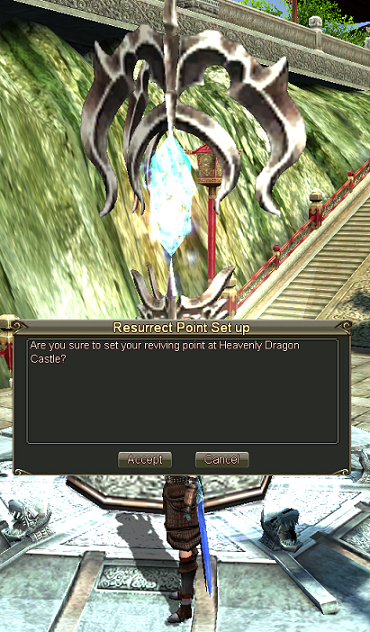 | The Samsara Stone looks like this on your City Map: |
Long Distance Teleport
You can travel between cities by speaking to the Dragon Express NPC. These travels are costly, though some of them may be free. Keep an eye on these free trips and bind yourself to a key city in order to save gold!
Local Map (default hotkey: N)
This is a more precise map of your current location and surrounding area. You can double-click anywhere on the map to have your character automatically walk there. You can also easily reach an NPC by clicking on their name in the list. Every trackable NPC in the local map is listed under the name of the village they are in. You can also see your current location on the map by looking for the gold arrow.
Note: If your character gets stuck on an obstacle or starts running automatically, move a few steps and try again.
On it you will see the names of nearby villages, teleportation crystals and quest givers (blue and yellow exclamation and question marks). Exits to other maps are marked with black arrows and the recommended level range for those areas. Your character will appear as a yellow cursor on the map.
Short Distance Teleport
You can use the blue crystals, shown on the map, to travel to other nearby crystals. These trips are cheaper than the long-distance ones and are a quick way to reach the next quest giver or dungeon.
City Map (default hotkey: N while in a city zone)
If you are currently in a city, your local map will have icons for merchants (square images) as well as trackable quest givers (blue or yellow dots). You can double-click anywhere on the map to have your character automatically walk there. You can also easily reach an NPC by clicking on their name in the list. Every trackable NPC in the local map is listed under the name of the village they are in.
Note: If your character gets stuck on an obstacle or starts running automatically, move a few steps and try again.
Your character will appear as a yellow cursor on the map.
 | You can navigate through the City, Local and World maps by simply clicking Back. This takes you one map back. For example, clicking Back from the City Map sends you to the Local Map, and from there to the World Map. |
Clicking Available Quests opens a list of quests that you have not yet picked up but are available for your character. See the Quest Guide for more details about this window.
Reminders (mini-map button, top-right of the interface)
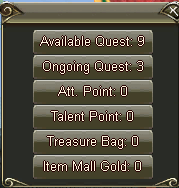 | This is a quick overview of important game information. It will appear each time you gain a level to remind you to spend your skill and attribute points. |
System Menu (default hotkey: Esc)
| This menu allows you to change game settings such as graphics and sound. From here you can also set new hotkeys and return to the character screen. | 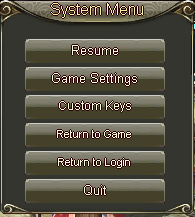 |
10. Crafting
Crafting/Production
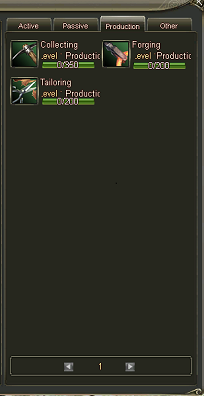 | Crafting in Loong will give you experience as well as valuable items or upgrades. There are 10 available crafting skills, of which you can learn 3. If you find that you do not like the skills you chose, you can always go to the NPC called "Crafting Skill Teacher" located in certain cities, such as Heavenly Dragon City. You can view your Crafting skills in your Skills window (default hotkey: K) under the Crafting tab. Skills can be leveled up the more you use them. All of these skills are currently at level 1, and all of them have 0 experience. For example, once the Collecting skill reaches 350 experience, it will level up. |
Active and Passive Crafting Skills
| Just like other skills, certain crafting skills are active, while others are passive. The Collecting skill is passive; it will not open a window if clicked or do anything special unless you are in front of a collecting node. The skill tooltip tells you which nodes can be harvested with the skill you chose. | 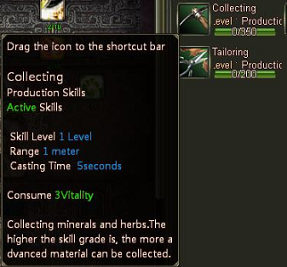 |
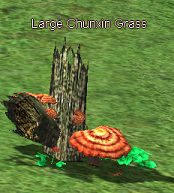 | Simply double-left-click on a node to harvest it. The higher your skill level, the better the quality of the harvested items. |
Using Active Crafting Skills
Active crafting skills open another window when used. All your recipes are listed on the left. When you select a recipe, you can see the required items (in this example, Cotton Cloth) and a short overview of the item.
Remember that crafting uses vitality. If you have no vitality left, you will not be able to craft. Vitality recharges while you are offline, or you can buy an item from the Dragon Market to recharge it.
11. Dragon Market and Ingots
11. Dragon Market (default hotkey: V)
You can acquire various useful items, pets, armor and fashion sets by visiting the Dragon Market. Unlike normal NPC or player merchants, the Market can be accessed from anywhere in the game, which is useful if you suddenly run out of potions in the middle of a dungeon.
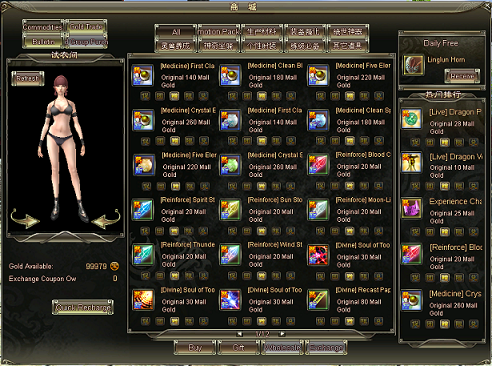
To buy items at the Dragon Market, you need Ingots. You can purchase them on the official website or through the in-game Gold Trade.
Preview
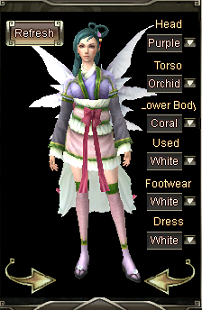 | The preview on the left side of the Market window lets you see exactly how a piece of armor will look on your character. Left-click an armor or fashion item in the Market window to place it on your character. Click Refresh to remove all items from the preview. Once an item is selected, you can also change its color. These items have not been purchased; the preview is for information only. Changing the preview's color scheme does not change the color of the item you buy. Items are sold in their default color; to change it, you will need to dye the item. Dye can be purchased at the Dragon Market. |
Daily Free
| Every day you can receive a special gift from the Dragon Market. Click the Receive button at the top-right of the window. The items will be sent to your Bag, and you need at least one free Bag slot to receive them. | 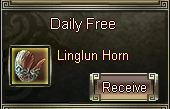 |
Buy and Gift
To buy an item, left-click it once and click Buy at the bottom of the window. Alternatively, right-click the item once. A message will prompt you to Confirm or Cancel the transaction. Purchased items appear in your inventory immediately, so make sure you have at least one free Bag slot.
If your inventory is full, a message will say the transaction could not be completed. You will not lose any Ingots.
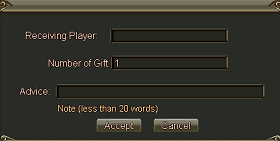 | You can send an item to someone using the Gift button at the bottom of the window. A form will ask for the player's name, the quantity and a short note. Then choose Accept or Cancel. |
Quick Recharge
If you have run out of Ingots and want to get more, click the Quick Recharge button. It opens a browser page where you can purchase Ingots.
Bulletin
This section keeps you up to date with Market news, such as new items and sales.
Gold Trade
You can exchange in-game money for Dragon Market gold through the Ingot Trade. There you will see lists of players who want to buy or sell Ingots. These are private player transactions, and the listed prices are not regulated or guaranteed. Check back often to find the best deals. | 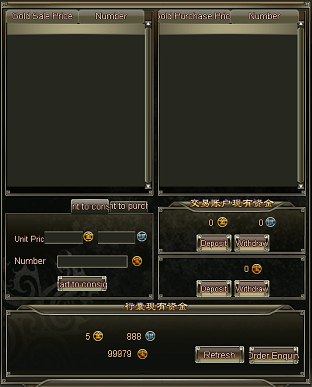 |
Step-by-step guide to acquiring Ingots
If you simply cannot find your Ingots in game, skip to the last step.
- Visit the gamigo Account System and log in. Make sure you are viewing its English version.
- Find Loong: The Power of the Dragon in the game list and select Shop.
- Select the packages you want and the quantity.
- Choose your preferred payment method. You can also restock Ingots quickly using the text-message purchase options.
- Review your packages and payment options. When ready, click Continue.
- Provide any additional information required by your selected payment method.
- After payment is completed and validated, your Ingots will be waiting for you in game.
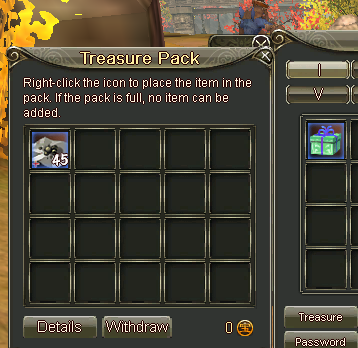 | Open your Bag with B, locate the Treasure tab and open it. |
12. Bag
Bag and Warehouse
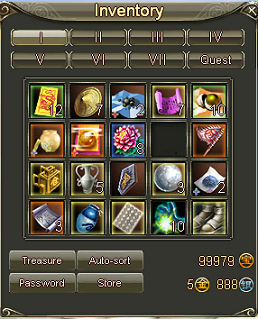
Here you can access all non-equipped items in your possession and see how much money you have. Open your Bag with the default hotkey B or click the bag icon on the right-hand menu bar.
| Ingots | You can spend them in the Dragon Market. |
|---|---|
 Gold Gold | You can spend it at NPC merchants. |
 Silver Silver | You can spend it at NPC merchants; 10,000 Silver equals 1 Gold. |
Bag Slots
You start with only the first bag slot open. You can increase your bag space by trading Auxiliary Bag items with the Warehouse Manager, found in most cities. Each Auxiliary Bag opens one new line of bag space, or five squares.
Treasure
This is a special inventory bag for certain items you receive in game. You cannot place items in this bag; you can only take them out.
Password
You can set a password for your Bag for extra protection.
Other Buttons
| Auto-Sort | Automatically sorts the items in your Bag. |
|---|---|
| Store | Allows you to create your own shop so other players can buy your items. |
Deleting Items
To delete an item, click and drag it out of your Bag onto the ground. If it is bound to you, a message will ask you to confirm or cancel its permanent deletion. Regular items will simply drop to the ground and can be picked up by you or another player.
When receiving quest rewards, you need as many free Bag squares as there are rewards, even if the items stack.
Warehouse
To access your Warehouse, speak with the Warehouse Manager in the nearest city. You can unlock more space by trading special items with the Manager. Portable Warehouses can also be received or purchased, letting you access your Warehouse from anywhere.
Usable Items
Drag usable items, such as health potions, to your hotbar for quick access. Once there, left-click the icon or press its hotkey to use the item. You can also right-click a usable item in your inventory.
13. Guild
Guild (default hotkey "G")
You can only open the Guild window once you have joined, or created, a guild.
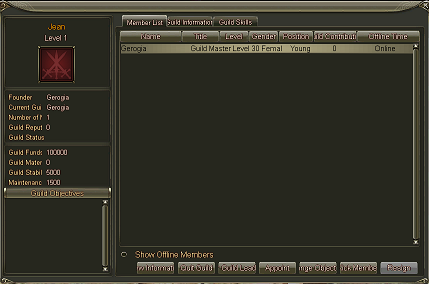
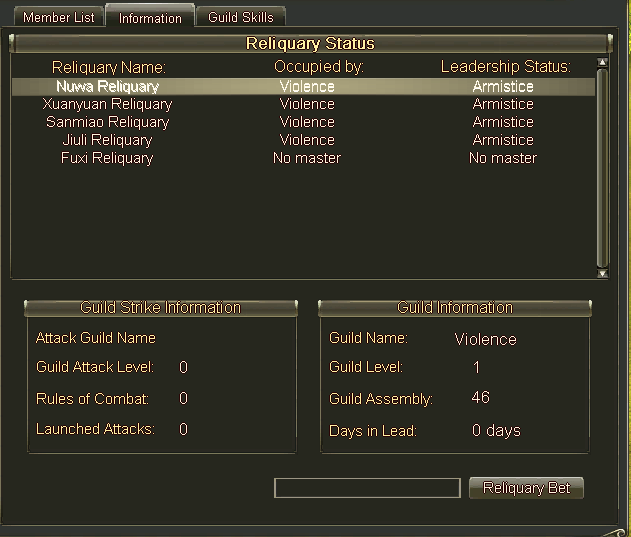
The guild window shows your current guild level and other important information. The Member List shows everyone enlisted in the guild; you can toggle offline members on or off. Select a member and click "View Information" to see more details or start a private chat.
Guild Information
Guild Skills
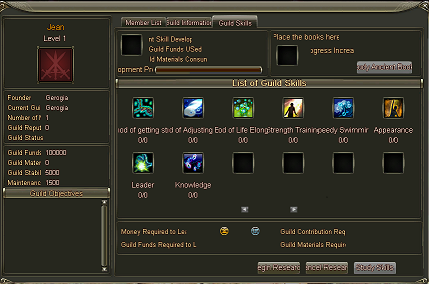
Guild skills can make every member stronger. Research skills, which cost money and materials, before they can be used. Choose carefully based on your guild's focus, such as PvE or PvP.
Creating a Guild
You must be at least level 20 and have 10 Gold. Speak to the Guild Officer in the nearest city and choose a name for your guild. The name cannot be changed, so choose one that represents the guild and attracts other players. You may transfer leadership at any time, but the leader cannot leave the guild.
Names considered offensive or derogatory will be removed and the guild deleted; further consequences may apply.
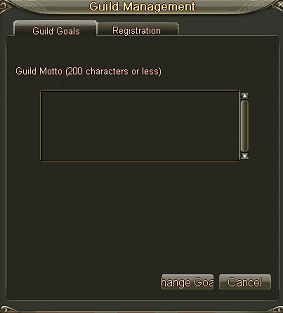 | Write a short description of your guild's goals to attract compatible players. |
| You can review invitations sent by your members and decide whether to accept new players. Contact potential members privately to see whether they will fit into the guild. | 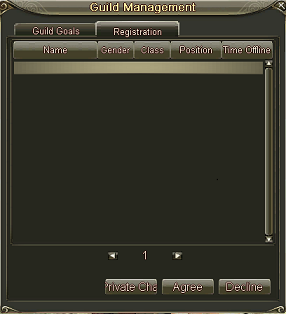 |
Dismissing Your Guild
To permanently delete your guild, speak with the Guild Officer in the nearest city. Only the leader can dismiss the guild.
Joining a Guild
You must be invited by a guild member to join a guild.
Guild Administrator
Speak to the Guild Administrator in the nearest city to buy skills, accept guild quests, and improve guild facilities. Upgrades require money and materials.
Guild Bank
After completing the required guild quest, you can unlock the guild bank and share items with other guild members. Speak to the Guild Administrator to receive the relevant quests.
14. Social
Friends (default hotkey "F") and Mentors
You will meet many players while playing Loong, and many can help you along the way. Add these players to your friends list. Use the "Add" button and enter a player's name to add them. If the player is nearby, right-click their character instead. Select a friend and use the "Remove" button to remove them from your list. BlacklistAdd players to your blacklist to prevent them from contacting you. If a player behaves inappropriately, please report them. | 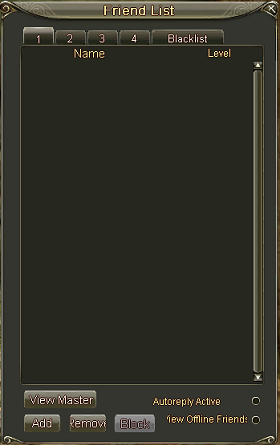 |
Master and Apprentice
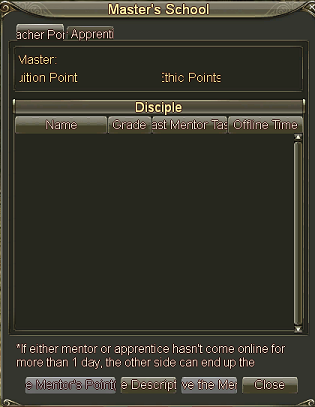 | Gain more experience by becoming an apprentice to a higher-level character or by becoming a master to new players. A master-apprentice relationship automatically adds the other person to your friends list. You cannot remove them until the relationship ends. Here you can keep track of your apprentices and your master, and view your master's other apprentices. |
4 — Teams
Some bosses and dungeons are too challenging to take on alone. Form a team to face bosses, dungeons, and other teams. Teaming up increases your strength and grants special buffs, which grow stronger based on whether teammates are friends or belong to the same guild.
Creating and Joining a Team
Invite another player by right-clicking their character or name in chat. If you start the team, you become its leader and can invite members and set looting preferences. To join an existing team, you need an invitation; accept or decline it in the window that appears.
Looting Preferences
Team leaders can set looting preferences from the "Extra Options" arrow beside the character portrait at the top left of the interface.
Passing Leadership and Leaving a Team
Use the same "Extra Options" arrow beside the character portrait to pass leadership to another player or leave the team.
15. Pets and Mounts
Pet Windows
Pets and mounts support your character: they can pick up items, use potions to help keep you alive, and carry you over long distances. Different pets can learn different helpful skills. Two windows let you manage and improve your pet.
Main Window (default hotkey "P")
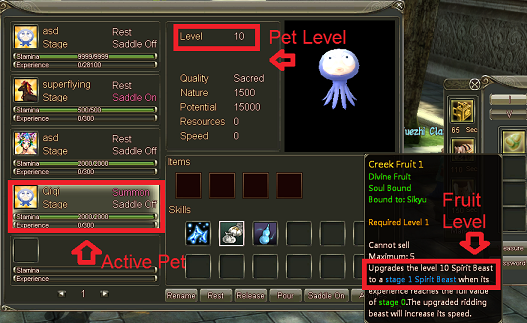
View your pet's status and basic information here.
| Green Bar | Pet stamina. Actions such as picking up items consume stamina. It recovers when the pet rests or when you use special items. |
|---|---|
| Yellow Bar | Pet experience. Feed your pet special food or give it some of your own experience to help it level up. |
| These bars also appear in a small Pet Window at the top left of the interface when a pet is summoned. | 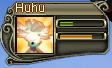 |
| Level | Player level required to use the pet. |
|---|---|
| Quality | The pet's rarity, from common to sacred and beyond. |
| Nature | The pet's loyalty. |
| Potential | The higher the potential, the more skills the pet can learn. |
| Resources | Special pet skills (coming soon). |
| Speed | Mount speed. It remains at 0 if the pet has not learned the Riding skill. |
Items
Pets can wear special equipment to improve their abilities. Summon the pet, then right-click an item in your Bag. Equipped items appear in the Pet Window.
Skills
Pets can learn many skills. Most start with one or two basic skills and learn more over time. See the Secondary Pet Window section below to learn how to teach skills.
| Rename | Change your pet's name. |
|---|---|
| Summon / Rest | Choose which pet accompanies you, or tell it to rest until you call it again. |
| Release | Release your pet. This permanently deletes it. |
| Pour | Give your pet some of your experience to help it level up. Certain items can also grant pet experience. |
| Prepare to Ride | If your pet has the Riding ability, prepare it before using the Ride skill. |
| Abilities | Place usable pet abilities on your shortcut bar. |
Mounts
A mount is a pet with the Riding ability. The tutorial in Dragon Village gives you a Riding skill book; learn this active skill from the Skill Window (default hotkey K). Not every pet can become a mount. Mounts have a small pet form and a riding form; until you use the Riding skill, they remain in pet form and help you as usual. Higher-level mounts have useful skills.
Secondary Pet Window (mini-map button, top right) 
This window offers more ways to manage your pet and its skills. Choose a pet at the top of the window to summon it.
| Purchase | Buy a pet. |
|---|
Production
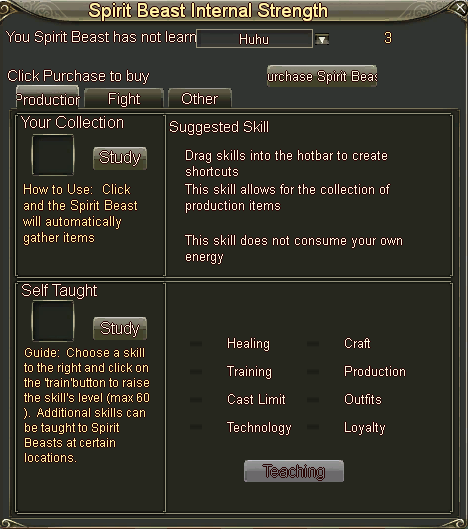
| Your Collection | Self-Taught |
|---|
Fight
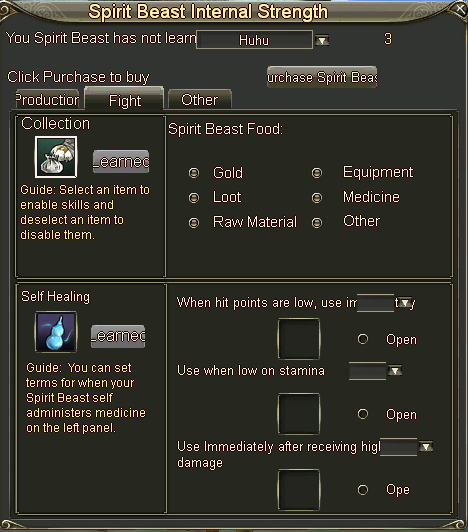
| Collection | Lets your pet pick up monster loot. Choose which items it collects; the more it picks up, the faster its stamina runs out. |
|---|---|
| Self-Healing | Set when your pet should use healing items by dragging them into the available slots. |
Other
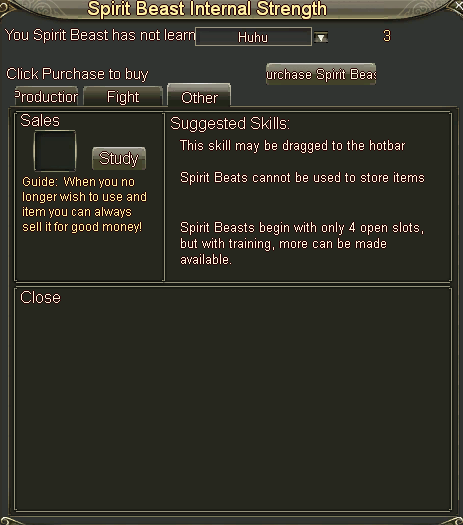
Spirit Beasts cannot be used to store items.
Spirit Beasts start with four slots; training can unlock more.
| Sales | When you no longer need an item, you can sell it for money. |
|---|
16. Quests
Quest Window (default hotkey "Q")
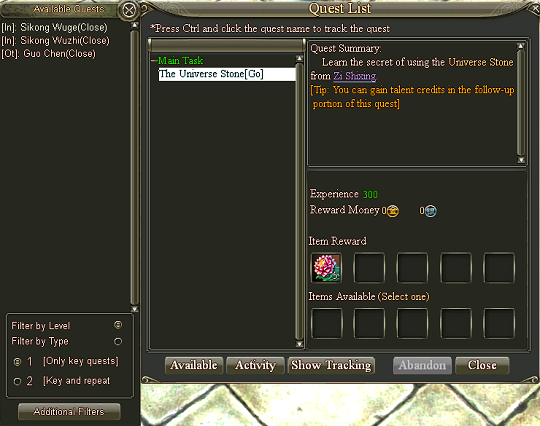
Loong has over a thousand quests that offer experience and valuable rewards. Use the quest journal to keep track of them.
Available Quests
Show or hide the Available Quests window. It lists quests you are eligible for but have not accepted. Click a quest to automatically move toward its NPC quest giver.
If your character does not move after selecting an NPC from the list, try moving a few steps. A cliff or object may be blocking the path.
Quest Filters
Filter available quests to find the ones you want to accept. The basic filters include:
| By Level | Shows quests suitable for your level. |
|---|---|
| By Type | Shows only selected types of quests. |
| Key Quests | Shows non-repeatable quests only. |
| Key and Repeat | Shows both repeatable and non-repeatable quests. |
| Click "Additional Filters" to open advanced quest filter settings. | 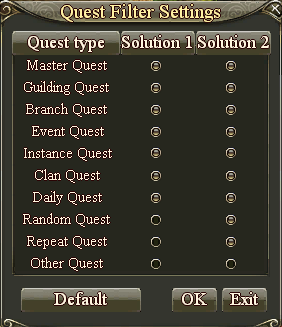 |
Activity
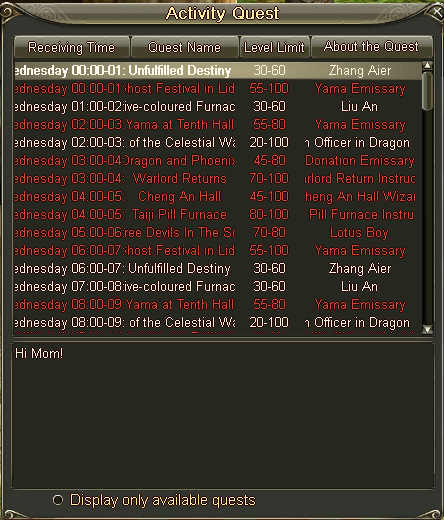 | Activity quests are special events you can join. Use the tabs at the top of the window to filter the list, then speak to the indicated NPC to participate. |
Show Tracking
Turns the quest-tracking window on or off in your interface.